The ABC's of fall protection are a set of fundamental principles that are essential to ensuring safety while working at heights.
These principles are:
A - Anchorage: A secure point of attachment must be identified and used to secure the fall protection system. This anchor point must be strong enough to support the weight of the worker and the equipment.
B - Body harness: A full-body harness is worn by the worker to distribute the force of a fall over the entire body, reducing the risk of injury. The harness must be properly fitted and adjusted to ensure maximum protection.
C - Connecting device: A connecting device such as a lanyard or lifeline is used to attach the worker's harness to the anchor point. The connecting device must be designed to absorb the force of a fall and prevent the worker from hitting the ground.
"A" - Anchorage Point
An anchorage point is what holds a person during and after a fall. Typically, this is something that is permanently attached to the structure where work is being completed.In most cases, a steel member is a preferred choice for an anchor point. Any bolts and washers used for the anchorage point should be inspected and evaluated for their load-bearing capabilities.
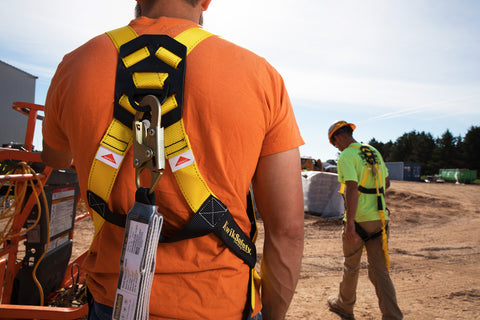
"B" - Body Harness (Safety Harness)
There are specialty harnesses for every job application and industry. A wide variety of styles and complexities from standard harnesses to more premium harnesses. When selecting a harness it is important to choose the d-ring configuration for the fall protection requirement depending on the type of work you will be performing.
A single d-ring Harness is sufficient for basic fall protection as the connector will attach to the back d-ring of the harness.
If the application calls for more restraint or positioning, then a 3 d-ring harness will provide side positioning for attachment of positioning and/or restraint lanyards.
" C" - Connector
The "Connector" is anything that brings the anchorage and body harness together. Connectors are designed to attach to the full-body harness and anchorage point, the connecting means is what determines the length of a worker’s potential fall.
Two Types of Connectors
Safety Lanyard
A lanyard is a short, flexible line of rope, wire rope, or webbing strap with connectors at each end. Lanyards are attached to a full-body harness at one end, and to a deceleration device, shock absorber, anchorage connector, or anchorage point at the other end. Many lanyards include an internal or external shock absorber designed to reduce the force exerted on a worker in the event of a fall. Shock Absorbing Lanyard/SRL - serve to dissipate or limit the substantial amount of energy imposed on a worker in the event of a fall. During a fall a worker free fall at a rate of 64 feet in as little as 2 seconds and can be subjected to catastrophic arresting forces as much as 5k lbs. without a deceleration device such as aKwikSafety Rattlershock absorbing safety lanyard. Slow the descent and limit arresting forces to under 900 lbs.
Self-Retracting Lifeline
A self-retracting lifeline performs the same function as a lanyard, connecting the worker’s safety harness to an anchorage point, but with one key difference. Rather than hanging freely, a self-retracting lifeline retracts automatically into the unit housing and must limit the free-fall distance of the worker to two feet or less. Because of the function of a self-retracting lifeline, it only needs to meet a minimum tensile load of 3,000 lbs.
Are the Components Compatible?
When looking to properly outfit your team, it's important to confirm that you have a product that is ANSI tested and meets OSHA regulations. It is also best practice to ensure that all the components within any fall arrest system are compatible with one another.
At KwikSafety we offer a one-stop-shop for you to outfit your team with an ANSI Tested and OSHA Compliant product that is compatible with any SRL, safety lanyard, or vertical lifeline.
Following these ABC's of fall protection is critical for preventing falls and ensuring the safety of workers who are working at heights. It is also important to receive proper training and to regularly inspect and maintain all fall protection equipment to ensure that it is in good working condition.
If you have more questions, please visit our FAQ page.
Fall Protection • Harness Know-How • Connection Points
Understanding D-Ring Placement: What Each Connection Point Is For
Read more
On a safety harness, each D-ring has a job. Knowing which ring to clip to—and when—prevents accidents, keeps you compliant, and improves comfort at height.
Dorsal D-Ring (Back): Primary Fall Arrest Anchor
📍 Location: Center of the upper back, between the shoulder blades 🔸 Used For: Fall arrest, rescue, vertical lifelines
The dorsal D-ring is the go-to connection for most work-at-height tasks. It’s designed to stop a fall and spread forces across strong body areas. Use it with energy-absorbing lanyards or SRLs, keeping the anchor above D-ring height to limit free fall.
Key Point: In most general and construction scenarios, fall arrest connections belong on the dorsal D-ring.
Side D-Rings (Hips): Work Positioning
📍 Location: One on each hip 🔸 Used For: Hands-free positioning on poles, towers, or vertical faces
Side D-rings let you lean back and work with both hands. They are not for fall arrest and must be backed up by a separate fall arrest system when exposure exists.
Use with caution: Always pair positioning with an independent fall arrest connection.
Sternal D-Ring (Chest): Ladders & Rescue
📍 Location: Center chest 🔸 Used For: Fixed-ladder systems, guided fall arrest, controlled descent, rescue
Common on climbing-style harnesses, the front D-ring keeps you upright during a slip or controlled descent and is often required by guided rail or rope-grab systems.
Note: Verify your ladder or guided system specifies a front attachment.
Shoulder D-Rings: Retrieval & Confined Space
📍 Location: Top of each shoulder strap 🔸 Used For: Vertical retrieval with tripod/winch systems
Shoulder D-rings are for vertical raise/lower during entry or rescue. They’re not for fall arrest or positioning and are typically used as a pair.
Paired Use: Connect both shoulders to a retrieval device to keep the body upright.
📌 Quick Reference Chart
D-Ring Placement
Fall Arrest
Positioning
Rescue/Retrieval
Dorsal (Back)
✅
❌
✅
Side (Hips)
❌
✅
❌
Sternal (Chest)
✅ (system-specific)
❌
✅
Shoulders (Top)
❌
❌
✅
Pro tips
Keep anchors overhead; minimize free fall and swing fall exposure.
Match the D-ring to the task: dorsal for arrest, sides for positioning, sternal/shoulders for system-specific uses.
Inspect webbing, stitching, labels, and hardware before each use; remove any damaged gear from service.
Our harnesses, lanyards, and SRLs are ANSI tested and are OSHA compliant, ensuring dependable performance for fall arrest, positioning, and rescue when used as directed.
Fall protection has evolved dramatically—and every step forward has saved lives. Here’s how we went from hemp rope to modern SRLs, and why today’s tested gear matters.
Early industry: ropes & natural fibers
In the early days of industrialization, “protection” was basic: ropes and harnesses made of hemp or cotton. They were uncomfortable, weak by today’s standards, and often unreliable.
1900s–1930s: safety nets arrive
Safety nets made from canvas or hemp became common on major builds and shipyards, catching workers and reducing fatalities. Nets still required careful setup and maintenance.
1950s: personal fall arrest systems (PFAS)
The shift to body-worn systems—harness + lanyard—was a leap forward. PFAS let workers move freely while providing arrest capability without relying on nets.
1970s–1990s: materials & mechanisms improve
Advances in webbing, stitching, hardware, and energy absorption brought stronger harnesses, shock-absorbing lanyards, retractable lifelines, and better comfort and durability.
Today: lighter, smarter, tested
Modern gear is lighter, more ergonomic, and easier to use—so workers are more likely to wear and use it correctly. Properly selected and maintained gear can be the difference between life and death.
Our fall protection products are ANSI tested and are OSHA compliant, ensuring they meet rigorous standards for force limits, durability, and performance when used as directed.
Always inspect gear before use and follow your site’s fall protection plan.
What You Need To Know About a Fall Protection Arrest System Safety
Read more
This week, we reflect on lives lost at work. In one 2020 case, a 55-year-old technician fell 90 ft from a 400-ft tower. The ladder safety sleeve failed to arrest, the chest D-ring tore from the harness, and the worker died. Even with on-site monitoring, incompatible or faulty gear can turn routine tasks deadly. Here are straight-to-the-point answers to common ladder fall-protection questions.
What is a ladder safety system?
Ladder Safety System — A system attached to a fixed ladder that reduces the chance of a fall. Typical parts include a carrier rail/cable, a safety sleeve (runner), a lanyard, connectors, and a body harness.
Can you use a ladder as an anchor point?
No. Portable ladders are freestanding. Tying off to one means both you and the ladder can fall. Even tied and staked, a ladder is not an approved anchor. Use approved anchors and tie off independently of the ladder.
Pair your safety harness with a cross-arm strap like the GIBBON Cross Arm Strap on a rated structure. Working capacity 310 lb; minimum breaking strength 5,000 lb.
How to attach a safety harness while on a ladder
Clip the lifeline or SRL to a rated roof/structure anchor.
Connect your dorsal (back) D-ring to the lanyard/SRL.
With rope systems, squeeze the rope grab and slide as you move; keep the device above D-ring height to limit free fall.
Are your components compatible?
Verify OSHA compliance and ANSI ratings and ensure your sleeve, rail/cable, connectors, lanyard/SRL, and harness are meant to work together. Mismatched parts can fail under load.
Our fall-protection lines are designed as systems: choose the SCORPION Harness solo or the complete Fall Protection Kit (1-D harness with attached 6' lanyard + 3' cross-arm strap, with bags).
Is the harness comfortable?
If gear is hot, heavy, or pinches, workers won’t wear it right. Consider padded back support and breathable webbing. Our TYPHOON and HURRICANE harnesses add lumbar support to reduce fatigue and improve fit.
Are you wearing fall protection correctly?
Hold by the dorsal D-ring.
Shake out straps.
Inspect webbing, stitching, labels, and hardware.
Don the harness; secure leg, chest, and shoulder straps.
Adjust for snug fit—two-finger rule at legs.
Check D-ring sits between shoulder blades.
Tuck loose strap ends.
Attach to approved anchor with rated lanyard/SRL.
Our fall protection systems are ANSI tested and are OSHA compliant, ensuring performance, durability, and force-limiting when used as directed.
This article is general safety guidance and not a substitute for site-specific training. Always follow your employer’s fall-protection plan and the manufacturer’s instructions.
The Hierarchy of Fall Protection is a step-by-step method to remove or reduce fall hazards. Always evaluate solutions in order—start by eliminating the hazard and end with administrative controls.
1) Hazard Elimination
Redesign the task so no exposure to a fall exists.
Example: Use a light-bulb changer pole instead of climbing a ladder.
2) Passive Fall Protection
Install physical barriers that separate workers from edges; less room for user error.
Example: Guardrails/railing at roof edges, mezzanines, and openings.
3) Personal Fall Restraint
Limit a worker’s range so they cannot reach the edge. Requires anchors and fixed-length lines.
D-Ring Extenders: When to Use Them (And When Not To)
Read more
In a fall protection system, every link matters—including the humble D-ring extender. Used well, it speeds hookups and reduces awkward reach. Used poorly, it can add dangerous fall distance. Here’s the quick guide.
📏 What is a D-Ring Extender?
A short strap (typically 18–24 in.) that clips to the dorsal D-ring and relocates your connection point to an easier-to-reach spot.
Webbing: polyester or reinforced synthetic fibers
Ends: snap/rebar hook + D-ring or sewn eye
✅ When to Use a D-Ring Extender
Ease of connection: Bulky clothing or limited mobility makes the back D-ring hard to reach.
Harness geometry: Low-sitting dorsal points—bring the hookup to shoulder height.
Quick hookups: Vertical SRL or bucket/ladder work where speed and ergonomics matter.
⚠️ When Not to Use One
Added fall distance: The extender length is added to your total clearance.
Energy management mismatch: Can change how a shock pack or SRL performs.
Leading-edge work: LE-rated SRLs have strict clearances—extenders may void compliance.
📌 Clearance math (example): 6 ft free fall + 3.5 ft deceleration + 2 ft extender + 1 ft safety margin = 12.5 ft required.
🔗 Harness & System Compatibility
Labeling: Confirm the harness OEM permits extenders on the dorsal D-ring.
Ratings: Verify component requirements to ANSI/OSHA (e.g., ANSI Z359 series; OSHA 1926 Subpart M).
Inspection: Check stitching, hardware, and tags before every use.
👍 Safer Alternatives (when clearance is tight)
Use a harness with a front/sternal D-ring for ladder systems rated for front attachment.
Mount an overhead anchor or use short-lead SRLs to reduce free fall.
Select an SRL with swivel top to ease connection without extra length.
Bottom line: D-ring extenders boost accessibility but shrink your safety margin. Recalculate fall clearance, confirm compatibility, and choose the configuration that keeps you compliant—and off the ground.
Our D-ring extenders are ANSI tested and are OSHA compliant, ensuring dependable performance when installed and used per instructions.
The Top 10 Fall Protection Tips to Ensure Worker Safety
Read more
Falls are a leading cause of workplace deaths and injuries. A clear plan, trained people, and compliant gear save lives. Use these tips to build a safer jobsite today.
Per updates to OSHA 1910, workers doing temporary or infrequent work within 6–10 ft of an unprotected leading roof edge must have fall protection.
Top 10 Fall Protection Tips
Do a risk assessment: Identify edges, openings, ladders, and tasks at height. Rank by exposure and consequence.
Choose the right control: Follow the hierarchy—eliminate, guard, restrain, then arrest as a last resort.
Use rated anchors: Install engineered or rated anchor points per OSHA/ANSI and manufacturer guidance.
Fit the harness: Snug chest strap, leg straps, and dorsal D-ring at shoulder blades. Tuck excess webbing.
Match connector to task: Select lanyards/SRLs for needed clearance, leading-edge rating, and mobility.
Ladder basics: Maintain 3 points of contact; extend 3 ft above landing; tie off ladders where required.
Guard where you can: Use guardrails, covers, toe-boards, and safety nets to prevent falls.
Inspect before each use: Check webbing, stitching, labels, hooks, and SRL function. Remove damaged gear.
Plan for rescue: Name a rescue lead, stage equipment, and drill. Target prompt retrieval after a fall.
Train and supervise: Provide initial and refresher training; enforce rules; communicate daily hazards.
Integrate systems responsibly. Ensure anchors and structures can handle loads without damage, and that forces are distributed safely during a fall.
Our fall protection products are ANSI tested and are OSHA compliant, ensuring dependable performance when installed and used per instructions.
Different jobs need different gear. If you’d rather not add items one by one, our combos, kits, and bundles make checkout fast—and keep your setup compatible out of the box.
You’ll find kit options on many product pages (see an example). Need a different mix? Build your own with our Kwik-Kit Builder.
What’s in a typical kit?
Full-body harness (size options available)
Connector: shock-absorbing lanyard or SRL
Approved anchor (e.g., cross-arm strap or roof anchor)
Regulations evolve, gear improves, and bad advice lingers. Here are five myths that can put crews at risk—and the facts to keep you compliant and safe.
Myth 1: “The 6-foot rule keeps me safe.”
Reality: There is no fixed “safe distance” from an edge. In construction, OSHA Subpart M requires fall protection at ≥6 ft, and protection is required near hazardous equipment regardless of height.
Myth 2: “Short falls don’t cause serious injuries.”
Reality: Even low heights can be fatal. Minimum trigger heights: 4 ft (General Industry), 5 ft (Shipyards), 6 ft (Construction), 8 ft (Longshoring). Wear the right PPE every time.
Myth 3: “A parapet means I don’t need active protection.”
Reality: A parapet only substitutes for a guardrail if it meets height specs—42 in ±3 in and continuous. If it’s shorter or gaps exist, add guardrails or a PFAS.
Myth 4: “One training class is enough.”
Reality: Training must be thorough and refreshed. 1926.503 requires training and retraining when gear, hazards, or procedures change—plus selection, use, and inspection.
Myth 5: “All fall protection gear expires in 5 years.”
Reality: The old 5-year idea was removed. Per ANSI/ASSP A10.32, service life follows the manufacturer and inspections. Remove gear after impact or if damaged; see OSHA 1926.95.
Quick checklist
Assess hazards and choose the right system (restraint vs. arrest).
Keep anchors, connectors, and harnesses compatible and rated.
Inspect before each use; document findings.
Train, retrain, and practice rescue plans.
Our fall protection products are ANSI tested and are OSHA compliant, ensuring dependable performance when used as part of a compliant system.
Small errors at height can have big consequences. Use this checklist to spot and fix the most common fall protection mistakes before work begins.
Neglecting risk assessments
Fix: Do a task-specific hazard assessment. Document edges, clearances, anchors, rescue access, and compatible gear.
Using incorrect or damaged equipment
Fix: Train workers to inspect before each use. Remove gear with cuts, UV damage, failed labels, or impact indicators.
Poor training and awareness
Fix: Provide hands-on donning, fitting, anchoring, and inspection training with refreshers when gear or jobs change.
Inadequate anchoring
Fix: Use approved anchors sized for load and direction. Follow manufacturer specs; avoid improvised tie-offs.
Overconfidence
Fix: Reinforce a “no shortcuts” culture. PPE enables safe work—it doesn’t excuse unsafe behavior.
Missing rescue plan
Fix: Pre-plan prompt rescue. Identify responders, gear, access routes, and practice drills on site.
Quick add-ons to audit
Fall clearance math verified for lanyards/SRLs.
Harness D-ring used for the correct function.
All components compatible and rated together.
Inspection logs maintained and reviewed weekly.
Our harnesses, lanyards, SRLs, and anchors are ANSI tested and are OSHA compliant, ensuring dependable performance when used in a properly planned system.
Falls remain the #1 killer in construction. The good news: most are preventable with planning, the right gear, and trained people working a clear plan.
Understanding the issue
High fatality rates: Falls account for a major share of deaths at job sites.
Severe injuries: TBIs, fractures, and long-term disability are common outcomes.
High costs: Medical bills, comp claims, delays, and insurance hikes.
10 proven controls
Training & education: Teach hazards, fit/inspection, anchoring, rescue.
Risk assessment: Identify edges, holes, leading edges, access, and rescue.
Use proper equipment: Harnesses, lanyards, SRLs, anchors, helmets—fit and inspect.
Scaffold safety: Build per code; inspect daily and before each use.
Guardrails & barriers: Rails, toe boards, and covers on all exposures.
Ladder safety: Right ladder, right angle, stable base, three points of contact.
Regular inspections: Audit site and gear; correct hazards immediately.